Outdoor Faucet Leaking? How to Fix It Fast
A leaking outdoor faucet can damage your San Diego home's foundation. Learn to find the leak's source and fix simple issues like washers or packing nuts.

The short answer
- Where it leaks tells you the fix: from the spout means a worn washer, at the handle means the packing nut, from the top means the anti-siphon valve.
- Most washer and packing repairs are a 30-minute DIY job with under $10 in parts; shut off the water to that line first.
- San Diego hard water scale and coastal salt air make these faucets fail faster, especially in beach communities.
- Water seeping from the stucco where the faucet meets the wall is a pipe leak, not a faucet leak, and needs a pro right away.
- Pro costs: simple repair $150 to $300, full faucet replacement $250 to $500; call (858) 400-4417 for a same-day estimate.
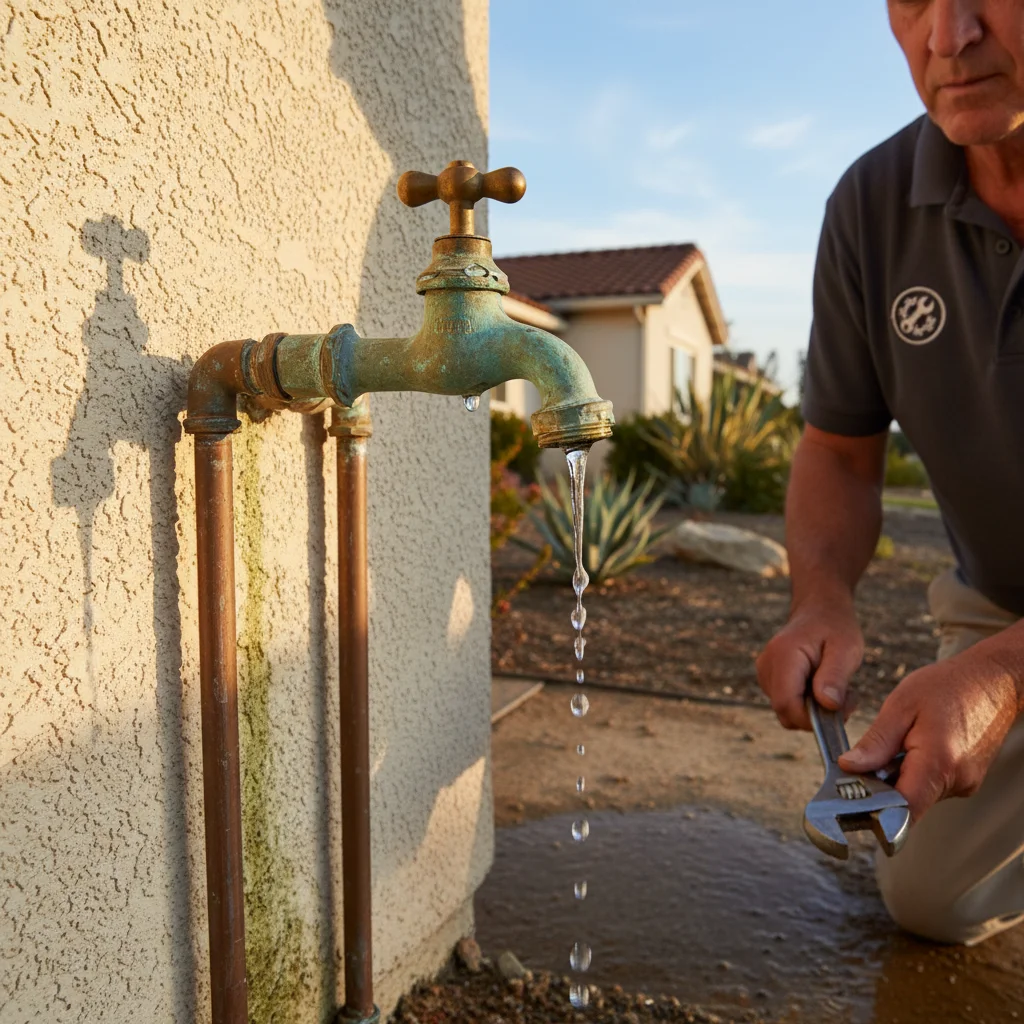
Where your outdoor faucet leaks tells you exactly what to fix. Dripping from the spout when the handle is off means a worn washer. Seeping around the handle when the water is on means a loose packing nut. Water coming out of the stucco where the faucet meets the wall means a pipe leak behind the wall that needs a plumber right away. Most of the first two cases are a 30-minute DIY fix with under $10 in parts.
The good news is that most outdoor faucet leaks are simple fixes you can handle yourself. The key is knowing what’s causing the leak and when the problem is bigger than it looks.
Why outdoor faucets leak (and why San Diego ones leak more)
An outdoor faucet, also known as a hose bib or spigot, is a simple mechanical device. And like any machine with moving parts and rubber seals, it eventually wears out. The most common culprits are internal washers and packing that degrade over time from use and pressure.
Here in San Diego County, our faucets face a few extra challenges. First, there’s our famously hard water. As water from the Colorado River evaporates, it leaves behind mineral deposits (scale) that can build up inside the faucet body. This scale buildup can prevent valves from closing completely and cause seals to fail prematurely. You can learn more about our region’s water composition from the San Diego County Water Authority.
Second, for coastal communities, the salty air is a major factor. Homeowners in Coronado, Encinitas, Carlsbad, and Imperial Beach see this all the time. The constant exposure to moist, salty air accelerates corrosion on the metal components of the hose bib, from the handle screw to the valve stem itself. This corrosion can freeze parts in place or eat away at the metal, causing leaks that can’t be fixed with a simple washer replacement.
Where the leak is coming from tells you the fix
Before you grab a wrench, you need to play detective. The location of the leak is the biggest clue to what’s wrong and how to fix it. An outdoor faucet leaking from different spots points to completely different problems.
Dripping from the spout (when the handle is off): This is the most common issue. If water is steadily dripping out of the end of the faucet where the hose connects, it almost always means the internal washer is worn out. This washer creates a seal when you turn the handle to shut off the water. Over time, it gets compressed, cracked, or hardened and can no longer stop the flow completely.
Leaking around the handle (only when the water is on): If you see water seeping out from the base of the handle when you turn the faucet on, the problem is likely the packing nut. This is the nut just behind the handle. It compresses a flexible material called packing (either a string-like substance or a small rubber washer) to prevent water from escaping around the valve stem. When it’s loose or the packing is worn, you’ll get a leak.
Water spraying from the top cap: Most modern spigots have an anti-siphon device or vacuum breaker on top. It’s a critical safety feature that prevents contaminated water from your garden hose from being sucked back into your home’s drinking water supply. If this part is leaking or spraying, its internal components have likely failed.
Hose bib washer vs. packing nut vs. anti-siphon valve
Understanding these three key components will help you diagnose your leaking outdoor spigot and buy the right parts for the repair. They are the source of 90% of outdoor faucet issues.
The Hose Bib Washer
This is the main seal inside the faucet. It’s a small, flat rubber disc that’s held in place at the end of the long valve stem by a single brass screw. When you turn the faucet handle clockwise to shut it off, the stem moves forward, pressing this washer against a “seat” inside the faucet body. This pressure is what stops the water flow. After hundreds of cycles, the rubber hardens and cracks, failing to make a complete seal. This is the fix for a spout that won’t stop dripping.
The Packing Nut and Packing
The packing creates a waterproof seal around the movable valve stem that the handle turns. Think of it as a gasket for a moving part. The packing nut is the component you see right behind the handle. It screws onto the faucet body and compresses the packing material (either a graphite/wax-infused string you wrap around the stem or a pre-formed rubber O-ring) tightly into the space around the stem. If this nut is loose, or the packing material inside is old and dried out, water will force its way out when the faucet is turned on.
The Anti-Siphon Valve
This is a one-way valve, usually a plastic cap on top of the faucet body. Its job is to let air in to break any vacuum (or “siphon”) effect if the city water pressure suddenly drops. This prevents dirty water from your hose, a puddle, or a fertilizer sprayer from being drawn back into your house plumbing. These can fail due to age, sun exposure making the plastic brittle, or mineral buildup. They are typically easy to replace by simply unscrewing the old one and screwing on a new one.
When you can DIY the repair in 30 minutes
For leaks from the handle or spout, an outdoor faucet repair is a great DIY project. You only need a few basic tools: an adjustable wrench, a pair of pliers, and a Phillips or flat-head screwdriver. The replacement parts cost less than five dollars.
Before you start any work, the most important step is to shut off the water supply to the faucet. Look for a separate shut-off valve for that specific line in your basement, crawlspace, or garage. If you can’t find one, you’ll need to shut off the main water supply to your entire house.
To fix a leak from the spout (washer replacement):
- Turn on the faucet to drain any remaining water.
- Use your screwdriver to remove the screw in the center of the handle and pull the handle off.
- Use an adjustable wrench to loosen and remove the large packing nut.
- Grip the end of the valve stem with pliers and turn it counter-clockwise, as if you were turning the water on. The entire stem assembly will unthread and come out.
- At the other end of the stem, you’ll see the old washer held by a screw. Remove the screw, pry off the old washer, and replace it with a new one of the exact same size.
- Reassemble everything in reverse order.
To fix a leak from the handle (packing nut fix):
- With the water on, use an adjustable wrench to gently tighten the packing nut (the one right behind the handle) about 1/8 of a turn clockwise. Often, this is all it takes.
- If it still leaks, shut off the water. Unscrew the packing nut completely. Use a small pick to dig out the old, hardened packing material.
- Replace it either with a new packing washer or by wrapping new packing string tightly around the stem in a clockwise direction.
- Re-tighten the packing nut. It should be snug, but not so tight that you can’t turn the handle.
When the supply line behind the wall is the real problem
If you see water seeping from the stucco or siding where the faucet meets the wall, you have a much more serious problem. This isn’t a faucet leak; it’s a pipe leak. The supply pipe that runs through your wall to feed the faucet is cracked or has a failed connection.
This is not a DIY job.
Water leaking inside a wall can cause catastrophic damage. It can rot the wooden studs, create a breeding ground for black mold, and damage your home’s foundation. The cost of inaction is enormous. If you suspect a leak behind the wall, you need professional leak detection immediately to pinpoint the source without needlessly tearing into your walls.
Our expert plumbers have seen firsthand the damage that a slow, hidden pipe leak can cause, especially in older homes. The fix requires opening the wall, performing a professional pipe repair, and then ensuring everything is properly sealed against future water intrusion. For coastal homes, like those we service for our clients from Del Mar to Coronado, we often find that the pipe itself has corroded due to long-term exposure to the salty air.
Replacement cost and what to expect
The cost to fix a leaking outdoor faucet depends entirely on the problem.
- DIY Repair: If you’re just replacing a washer or packing, you can expect to spend under $10 for parts at a local hardware store.
- Professional Simple Repair: If you call a plumber to replace the washer or packing, you’ll primarily be paying for the service call and their time. Expect this to be in the $150 - $300 range for a licensed, insured professional.
- Full Faucet Replacement: If the faucet body is cracked or severely corroded, it will need to be replaced. A professional plumber will charge for the new faucet plus labor, typically totaling between $250 - $500, depending on the type of faucet and the complexity of the installation.
- Wall Pipe Repair: This is the most involved and expensive scenario. The cost can range from several hundred to a few thousand dollars, depending on how much wall needs to be opened, the type of pipe, and the extent of the damage.
When to call us
You can and should handle the simple washer and packing repairs. But it’s time to call a professional if:
- You suspect the leak is coming from the pipe inside the wall.
- You’ve tried the DIY fixes, but the faucet is still dripping.
- The faucet is so old and corroded that you can’t get it apart.
- You simply don’t feel comfortable shutting off your water main or taking plumbing fixtures apart.
Fixing that leak protects your home’s value and conserves our precious San Diego water. If you’re in over your head, don’t hesitate. Call us at (858) 400-4417 for a same-day estimate.
Need a Plumber in San Diego?
Licensed, insured plumbers, available 24/7 across San Diego County. Upfront pricing, no surprises.
Call (858) 400-4417Available 24/7, no voicemail, no answering service